Friday 10 November 2017

AsyncTasks done right

As an Android developer you’ve probably already used AsyncTasks to perform long-running tasks in a separate thread and deliver the results back to the main Activity.
AsyncTask 
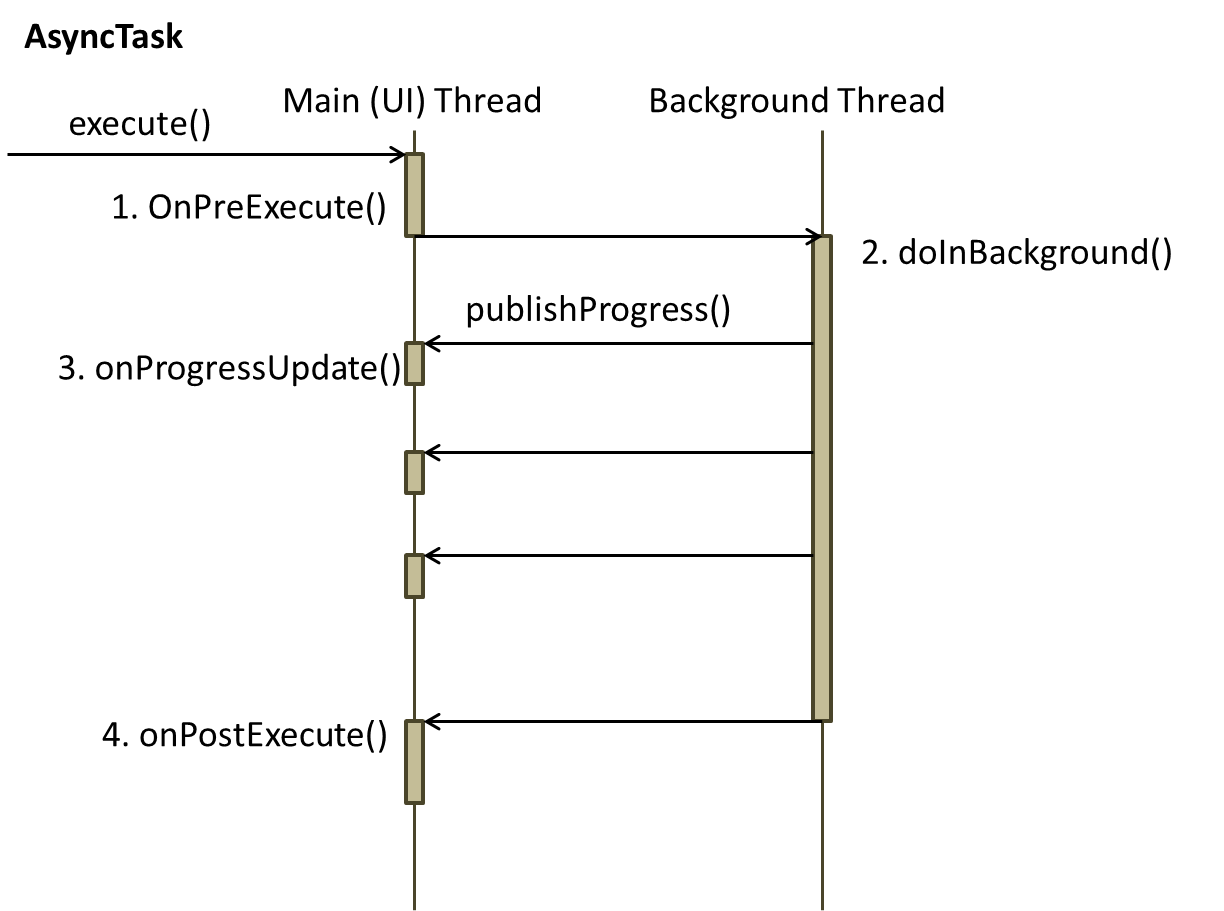
are particularly well suited for Activities, because they have coordinated callback methods that run:

  • in a separate thread (doInBackground), to perform long-running operations;
  • in the main thread (onPostExecute, onProgressUpdate, etc.) to display the results in the UI.

To be more precise, AsyncTasks are generally used for tasks that don’t last too much and are related to the content of an Activity (for example, saving the data provided by the user in a local database).

For long-running operations it is always better to use a Service, because the lifecycle of a Service is not so much affected by the lifecycle of the Activity (what happens if the user closes the app while a background thread is ongoing?).
Anyway, you’ve probably used AsyncTasks in a way like this:
public class MyActivity extends AppCompatActivity {
    
    // ...
    new MyAsincTask().execute(...);
    
    private class MyAsincTask extends AsyncTask {
        @Override
        protected Integer doInBackground(Integer... integers) {
            // long running task
        }

        @Override
        protected void onPostExecute(Integer integer) {
            // display results in MyActivity
        }
    }
}

Within Android Studio Lint gives you a warning, saying that non-static inner and anonymous classes could cause memory leaks.
What’s the problem exactly? Well, in Java non-static inner and anonymous classes hold an implicit reference to the outer class. In our example, the AsyncTask holds an implicit reference to the containing Activity. If we launch an AsyncTask to do some work in the background and, while the operation is ongoing, the user closes the app, the AsyncTask keeps an implicit reference to the Activity: this reference can’t be garbage collected, thus creating a memory leak.

To solve this problem we have to convert our AsyncTask in a static class. Static classes in Java are top-level classes and they don’t hold any implicit reference to the containing Activity.
This technique, however, raises another problem. When the AsyncTask has completed the background task and the method onPostExecute is invoked, the results must be delivered back to the Activity and displayed to the user: our AsyncTask needs a reference to the Activity (maybe we need a Context to start another Activity, or some widgets to display the results). If we use a regular (strong) reference, memory leaks may occur. Moreover, what happes if the Activity no longer exists because the user has closed the app?

The solution is using weak references. JVM ignores weak references. That means objects which have only week references are eligible for garbage collection. They are likely to be garbage collected when JVM runs the garbage collector thread. JVM doesn’t show any regard for weak references.
Using weak references doesn’t prevent the garbage collector from deleting unnecessary objects in memory. In the method onPostExecute, by invoking get() on the weak references, we check if the objects are still in memory or have already been garbage collected. Only in the first case we can display the results to the connected Activity.
Have a look at the following example (the parts of interest are highlighted):
public static class GetScheduledRecordingsTask extends AsyncTask> {
        @Inject
        DBHelper dbHelper;

        private final WeakReference weakFragment;
        private final WeakReference weakCalendarView;
        private final WeakReference weakCompactCalendarViewListener;

        private final Date selectedDate;

        public GetScheduledRecordingsTask(ScheduledRecordingsFragment scheduledRecordingsFragment, CompactCalendarView compactCalendarView, CompactCalendarView.CompactCalendarViewListener compactCalendarViewListener, Date selectedDate) {
            App.getComponent().inject(this);
            weakFragment = new WeakReference<>(scheduledRecordingsFragment);
            weakCalendarView = new WeakReference<>(compactCalendarView);
            weakCompactCalendarViewListener = new WeakReference<>(compactCalendarViewListener);
            this.selectedDate = selectedDate;
        }

        protected List doInBackground(Void... params) {
            return dbHelper.getAllScheduledRecordings();
        }

        protected void onPostExecute(List scheduledRecordings) {
            ScheduledRecordingsFragment scheduledRecordingsFragment = weakFragment.get();
            CompactCalendarView calendarView = weakCalendarView.get();
            CompactCalendarView.CompactCalendarViewListener compactCalendarViewListener = weakCompactCalendarViewListener.get();
            if (scheduledRecordingsFragment == null || calendarView == null || compactCalendarViewListener == null)
                return;

            calendarView.removeAllEvents();
            for (ScheduledRecordingItem item : scheduledRecordings) {
                Event event = new Event(ContextCompat.getColor(scheduledRecordingsFragment.getActivity(), R.color.accent), item.getStart(), item);
                calendarView.addEvent(event, false);
            }
            calendarView.invalidate(); // refresh the calendar view
            compactCalendarViewListener.onDayClick(selectedDate); // click to show current day
        }
    }

// ...

new GetScheduledRecordingsTask(scheduledRecordingsFragment, calendarView, compactCalendarViewListener, selectedDate).execute();

Thursday 26 October 2017

Testing Service lifecycle method calls

Let's suppose you have created a local Service (implementing the Local Binder Pattern) to perform some tasks for your app, delivering the results back to a connected Activity. 
It is important to properly test the Service to make sure it behaves as you expect. The first thing to do, as the Android documentation suggests, is testing the Service's lifecycle methods.

To be more precise:
  • ensure that the onCreate() is called in response to Context.startService() or Context.bindService(). Similarly, you should ensure that onDestroy() is called in response to Context.stopService(), Context.unbindService(), stopSelf(), or stopSelfResult(). Test that your Service correctly handles multiple calls from Context.startService(). Only the first call triggers Service.onCreate(), but all calls trigger a call to Service.onStartCommand()
If you are not familiar with testing Services you can first check the official Android documentation here:
Testing Your Service


But how do you do that without mixing the code of your Service, implementing you business logic, with the code needed to keep track of the method calls?

@VisibleForTesting

The @VisibleForTesting annotation indicates that an annotated method (or variable) is more visible than normally necessary to make the method testable. This annotation has an optional otherwise argument that lets you designate what the visibility of the method should have been if not for the need to make it visible for testing. Lint uses the otherwise argument to enforce the intended visibility.

You can also specify @VisibleForTesting(otherwise = VisibleForTesting.NONE) to indicate that a method exists only for testing. This form is the same as using @RestrictTo(TESTS). They both perform the same lint check.
For our purpose we can define some static variables, inside our Service, used to keep track of the lifecycle method calls. These variables are annotated with @VisibleForTesting, meaning that they are only used for testing purposes.
// Just for testing.
@VisibleForTesting(otherwise = VisibleForTesting.NONE)
public static int onCreateCalls = 0;
@VisibleForTesting(otherwise = VisibleForTesting.NONE)
public static int onDestroyCalls = 0;
@VisibleForTesting(otherwise = VisibleForTesting.NONE)
public static int onStartCommandCalls = 0;
In the relevant Service lifecycle methods we increment our counters:
@Override
public void onCreate() {
    Log.d(TAG, "RecordingService - onCreate");
    onCreateCalls++;
    // ...
}

@Override
public void onDestroy() {
    Log.d(TAG, "RecordingService - onDestroy");
    onDestroyCalls++;
    // ...
}

@Override
public int onStartCommand(Intent intent, int flags, int startId) {
    onStartCommandCalls++;
    // ...
}

You can see the whole class on GitHub (it's a hybrid Service, both bound and started, used to record audio with a MediaRecorder):
RecordingService.java

Testing the Service

Testing our Service is now very easy. We first define the ServiceTestRule as follows:
@Rule
public final ServiceTestRule mServiceRule = new ServiceTestRule() {
    @Override
    protected void afterService() {
        super.afterService();           
        RecordingService.onCreateCalls = 0;
        RecordingService.onStartCommandCalls = 0;
        RecordingService.onDestroyCalls = 0;
    }
};
Note that in the overriden afterService method, called when the Service is shut down after each test, we reset our counters to 0.

Testing the lifecyle method calls is now very easy:
/*
    Test that the Service's lifecycle methods are called the exact number of times in response
    to binding, unbinding and calls to startService.
*/
@Test
public void testLifecyleMethodCalls() throws TimeoutException {
    // Create the service Intent.
    Intent serviceIntent = RecordingService.makeIntent(InstrumentationRegistry.getTargetContext(), true);

    mServiceRule.startService(serviceIntent);
    IBinder binder = mServiceRule.bindService(serviceIntent);
    RecordingService service = ((RecordingService.LocalBinder) binder).getService();
    mServiceRule.startService(serviceIntent);
    mServiceRule.startService(serviceIntent);

    assertNotNull("Service reference is null", service);
    assertEquals("onCreate called multiple times", 1, RecordingService.onCreateCalls);
    assertEquals("onStartCommand not called 3 times as expected", 3, RecordingService.onStartCommandCalls);

    mServiceRule.unbindService();
    assertEquals("onDestroy not called after unbinding from Service", 1, RecordingService.onDestroyCalls);
}

You can have a look at the entire test class here:
RecordingServiceTest.java

Sunday 14 May 2017

Scheduling repeated tasks offline at (almost) exact times

As you probably know, starting from API level 21 (Lollipo) the best way to schedule repeated tasks on Android is using:
  • the JobScheduler API (requires API level 21+);
  • the Firebase JobDispatcher, which provides a JobScheduler-compatible API that works on all recent versions of Android (API level 9+) that have Google Play services installed.
Running apps in the background is expensive, which is especially harmful when they're not actively doing work that's important to the user.
In recognition of these issues, the Android framework team created the JobScheduler. This provides developers a simple way of specifying runtime constraints on their jobs. Available constraints include network type, charging state, and idle state.

On the other hand, the Firebase JobDispatcher uses the scheduling engine inside Google Play services(formerly the GCM Network Manager component) to provide a backwards compatible (back to Gingerbread) JobScheduler-like API.

Problem

However, both the JobScheduler API and the Firebase JobDispatcher, in order to save battery life, depend on the mainance windows of Doze.
In other words, if a user leaves a device unplugged and stationary for a period of time, with the screen off, the device enters Doze mode. In Doze mode, the system attempts to conserve battery by restricting apps' access to network and CPU-intensive services. It also prevents apps from accessing the network and defers their jobs, syncs, and standard alarms.Periodically, the system exits Doze for a brief time to let apps complete their deferred activities. During thismaintenance window, the system runs all pending syncs, jobs, and alarms, and lets apps access the network.
Doze - mantainance windows

Warning

In this post we'll focus on scheduling repeated tasks (even offline, whithout an internet connection) that should start at (almost) exact times.

AlarmManager

Although the aforementioned solution is preferable, because it enables to save battery life, there might be scenarios in which you want to schedule a repetead task to run with an exact timing, even when the device is in Doze mode.
A possible solution is using the AlarmManager. The exact methods and the pattern to follow varies depending on the Android version, because:
  • Doze was first introduced with Marshmallow (API level 23);
  • the AlarmManager methods for scheduling tasks have slightly changed with API leve 19.

The following table shows the methods to use:


repeated
exact times
display ON
repeated
exact times
display OFF
up to API 18
setRepeating
RTC or ELAPSED_REALTIME
(1)
setRepeating
RTC_WAKEUP or
ELAPSED_REALTIME_WAKEUP
API 19-22
setExact with manual re-scheduling
RTC
ELAPSED_REALTIME
(1) (2)
setExact with manual re-scheduling
RTC_WAKEUP
ELAPSED_REALTIME_WAKEUP
API 23+
setExact or setExactAndAllowWhileIdle with manual re-scheduling
(3)
setExactAndAllowWhileIdle with manual re-scheduling
(3)

(1) If an alarm is delayed (by system sleep, for example, for non _WAKEUP alarm types), a skipped repeat will be delivered as soon as possible. After that, future alarms will be delivered according to the original schedule; they do not drift over time. For example, if you have set a recurring alarm for the top of every hour but the phone was asleep from 7:45 until 8:45, an alarm will be sent as soon as the phone awakens, then the next alarm will be sent at 9:00.
(2) as of API 19, all repeating alarms are inexact. If your application needs precise delivery times then it must use one-time exact alarms, rescheduling each time. Legacy applications whose targetSdkVersion is earlier than API 19 will continue to have all of their alarms, including repeating alarms, treated as exact. With setExact the alarm will be delivered as nearly as possible to the requested trigger time.
(3) If you don't need exact scheduling of the alarm but still need to execute while idle, consider using setAndAllowWhileIdle(int, long, PendingIntent).

Frequency

For events less than 60 seconds apart, alarms aren’t the best choice: use the much more efficient Handler (http://goo.gl/CE9vAw) for frequent work.

setExactAndAllowWhileIdle: exact or not?

The method setExactAndAllowWhileIdle, used to trigger alarms even when the device is idle, can significantly impact the power use of the device when idle (and thus cause significant battery blame to the app scheduling them), so it should be used with care.

To reduce abuse, there are restrictions on how frequently these alarms will go off for a particular application:
  • Under normal system operation, it will not dispatch these alarms more than about every minute (at which point every such pending alarm is dispatched)
  • When in low-power idle modes this duration may be significantly longer, such as 15 minutes


Manual rescheduling

As you can see from the above table, starting with API 19 you have to use setExact or setExactAndAllowWhileIdle the schedule a repeated task at exact times.
Infact, as of API 19, all repeating alarms are inexact. If your application needs precise delivery times then it must use one-time exact alarms, rescheduling each time as described below. Legacy applications whose targetSdkVersion is earlier than API 19 will continue to have all of their alarms, including repeating alarms, treated as exact.

Create an AlarmManager instance:
AlarmManager alarmManager = (AlarmManager) getSystemService(ALARM_SERVICE);

Create an Intent to broadcast to a BroadcastReceiver:
Intent intent = new Intent(MyActivity.this, MyReceiver.class);

Create a PendingIntent that holds the intent:
PendingIntent pendingIntent = PendingIntent.getBroadcast(MyActivity.this, 0, intent, PendingIntent.FLAG_UPDATE_CURRENT);

Create the alarm:
alarmManager.setExact(AlarmManager.RTC_WAKEUP, initialDelay, pendingIntent);

Reschedule the next alarm in the onReceive method of your BroadcastReceiver using the same code described above.

WakefulBroadcastReceiver

The Alarm Manager holds a CPU wake lock as long as the alarm receiver's onReceive() method is executing. This guarantees that the phone will not sleep until you have finished handling the broadcast. Once onReceive() returns, the Alarm Manager releases this wake lock. This means that the phone will in some cases sleep as soon as your onReceive() method completes. If your alarm receiver called Context.startService(), it is possible that the phone will sleep before the requested service is launched. To prevent this, your BroadcastReceiver and Service will need to implement a separate wake lock policy to ensure that the phone continues running until the service becomes available.

An easy way to achieve this is by using a WakefulBroadcastReceiver. WakefulBroadcastReceiver is a BroadcastReceiver that receives a device wakeup event and then passes the work off to a Service, while ensuring that the device does not go back to sleep during the transition. This class takes care of creating and managing a partial wake lock for you; you must request the WAKE_LOCK permission to use it.

public class MyWakefulBroadcastReceiver extends WakefulBroadcastReceiver {
    @Override
    public void onReceive(Context context, Intent intent) {
        // Reschedule the alarm. See the code above.

        // Create an Intent to start a Service.
        Intent service = new Intent(context, MyService.class);

        // Start the service, keeping the device awake while it is launching.
        startWakefulService(context, service);
    }
}

The service (in this example, an IntentService) does some work. When it is finished, it releases the wake lock by calling completeWakefulIntent(intent). The intent it passes as a parameter is the same intent that the WakefulBroadcastReceiver originally passed in.

public class MyService extends IntentService {
    public MyService() {
        super("MyService");
    }

    @Override
    protected void onHandleIntent(Intent intent) {
        // Do some work here.
        // At this point SimpleWakefulReceiver is still holding a wake lock
        // for us.  
        // Note that when using this approach you should be aware that if your
        // service gets killed and restarted while in the middle of such work
        // (so the Intent gets re-delivered to perform the work again), it will
        // at that point no longer be holding a wake lock since we are depending
        // on SimpleWakefulReceiver to that for us.  If this is a concern, you can
        // acquire a separate wake lock here.

        // Release the wake lock after executing the task.
        SimpleWakefulReceiver.completeWakefulIntent(intent);
    }
}

Saturday 6 May 2017

Sticky Broadcast


Sticky Broadcast(s) are a special kind of Broadcast(s) that remain active for awhile after being sent. You can send a sticky Broadcast with the method:
Context.sendStickyBroadcast()

If you register a BroadcastReceiver that listens to sticky Broadcast(s), it can receive two kind of Broadcast(s):
  1. Broadcast(s) that have just been sent
  2. Broadcast(s) that have been sent previously and are still active
You can find out what kind of Broadcast you have just received with the method:
isInitialStickyBroadcast()
returning false if the Broadcast represents an event that has just occured.

Sticky Broadcast(s) are generally used for events lasting for a certain period of time. Examples of such Broadcast(s) sent by the system are:
  • Intent.ACTION_BATTERY_CHANGED: indicates changes in the battery level. BroadcastReceiver(s) must be programmatically registered with Context.registerReceiver()
  • Intent.ACTION_DOCK_EVENT: indicates when a device is placed on a dock
  • Intent.ACTION_DEVICE_STORAGE_LOW: indicates low memory condition
public class MyBroadcastReceiver extends BroadcastReceiver {
    public void onReceive(Context context, Intent intent) {
        String action = intent.getAction();
        if(action.equals(Intent.ACTION_DOCK_EVENT)) {
            if(!isInitialStickyBroadcast()) {
                // this is a new broadcast
            } 
            else {
                // this is an old broadcast
            }
        }
    }
}

In order to send sticky Broadcast(s) you must include the permission android.permission.BROADCAST_STICKY in the Manifest file.

If you want to remove a sticky Broadcast you can use the method:
Context.removeStickyBroadcast(Intent intent)
passing the Intent that was previously broadcast.

NB. Sticky Broadcast(s) consume system resources, so use them sparingly when really needed!

API level 21

Starting from API level 21 sticky Broadcast(s) are deprecated.
"Sticky broadcasts should not be used. They provide no security (anyone can access them), no protection (anyone can modify them), and many other problems. The recommended pattern is to use a non-sticky broadcast to report that something has changed, with another mechanism for apps to retrieve the current value whenever desired".